Starting with arduino: Multiple buttons on 1 pin

There might be a project where you want to use a lot of buttons. But there is a problem, if you connect each of the buttons to a different digital pin, you won't have any pins left for any other items you might want to connect to arduino. To avoid that I am going to show you, how you can use multiple buttons with 1 analog pin.
What you'll need:
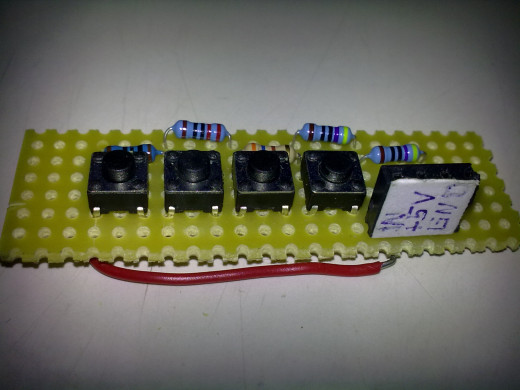
- 5 Different value resistors ( I used 100, 220, 360 and 2x470 Ω resistors)
- 4 buttons
Theory behind it
The way it works is quite simple. First you need to understand how voltage divider works. Here is example of one:

As you can see there are 2 resistors and in between there is an output wire which has voltage Vout. The value of Vout is always the same as voltage drop across resistor R2. If instead of Vout we connect the wire to arduino pin, we can read digital value of voltage drop across resistor R2. Now if we remove resistor R1 and use button in its place, we create circuit in which all of the voltage Vin drops across the button, because button is not pressed, therefore has infinite resistance.
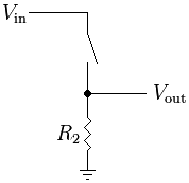
If all of the voltage drops across button, there is zero voltage drop across resistor R2, therefore Vout would be zero and arduino would read it as 0(LOW) if connected to digital pin or 0 if connected to analog pin. But if the button is pressed, all of the voltage would drop across resistor R2, because button would act like a wire with almost 0 resistance. In this case arduino would read incoming singal as 1(HIGH) if connected to digital pin or 1023 if connected to analog pin.
Now we can create a circuit in which Vout value changes depending on which button is pressed. The circuit is shown below:
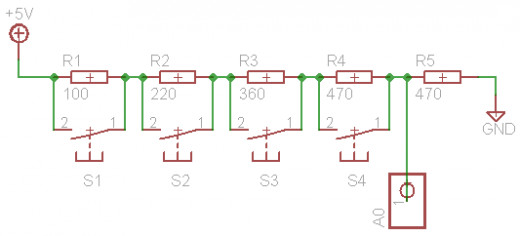
As you can see there are 4 resistors and 4 buttons connected in parallel. Once one of the button is pressed the total resistance of R1-4 changes, because one of the resistor becomes shorted by the button. Therefore the voltage drops changes, more voltage drops across resistor R5 and less on R1-4.
Now as you can see all of the resistors have different values, therefore the impact of one of them being shorted will be different. Resistor with least resistance has least impact on the value of Vout. So when you pick the resistors for your circuit try to select ones with somewhat similar value, don't put 100 ohms together with 1k+ ohms resistors, because the readings may become inaccurate.
Finding out values of button presses
In order to know which button is pressed we are going to create a program in which every 2 seconds button will be pressed and the value of readings from analog pin 0 will be posted in serial monitor. Program code is shown below.
const int buttons = 0;
void setup()
{
Serial.begin(9600);
pinMode(buttons,INPUT);
}
void loop()
{
int value = analogRead(buttons);
Serial.println("No button is pressed: ");
Serial.println(value);
delay(2000);
value = analogRead(buttons);
Serial.println("Button S1 is pressed: ");
Serial.println(value);
delay(2000);
value = analogRead(buttons);
Serial.println("Button S2 is pressed: ");
Serial.println(value);
delay(2000);
value = analogRead(buttons);
Serial.println("Button S3 is pressed: ");
Serial.println(value);
delay(2000);
value = analogRead(buttons);
Serial.println("Button S4 is pressed: ");
Serial.println(value);
delay(2000);
}
Results
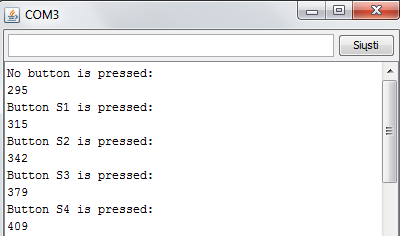
These values are not entirely correct, because resistors tend to heat up and their resistance increases. Therefore we have to make some changes to these values. As I tested button presses I noticed an error of ±1. So if button is pressed the readings have to satisfy this condition: ButtonValue-1<=Readings<=Buttonvalue + 1
Using buttons
Since we now know how to detect button presses with single analog pin, we are going to write simple program that detects which button is pressed and lights up one of the 4 LEDs.
Connect 4 LEDs with resistors to 5, 6, 7, 8 digital pins.
Code
const int buttons = 0;
const int LEDs[4] = {5,6,7,8};
void setup()
{
  pinMode(buttons,INPUT);
  for (int i = 5; i<9; i++)
  {
    pinMode(LEDs[i],OUTPUT);
  }
}
void loop()
{
  int value = analogRead(buttons); // Readings
  if(value>=314 && value <= 316) // Checking if first button is pressed
  {
    digitalWrite(LEDs[0],HIGH);
    for(int i = 0; i<4; i++)
    {
      if(i != 0)
      {
        digitalWrite(LEDs[i],LOW);
      }
    }
  }
  if(value>=341 && value <= 343)// Checking if second button is pressed
  {
    digitalWrite(LEDs[1],HIGH);
    for(int i = 0; i<4; i++)
    {
      if( i!=1)
      {
        digitalWrite(LEDs[i],LOW);
      }
    }
  }
  if(value>=378 && value <= 380)// Checking if third button is pressed
  {
    digitalWrite(LEDs[2],HIGH);
    for(int i = 0; i<4; i++)
    {
      if(i!=2)
      {
        digitalWrite(LEDs[i],LOW);
      }
    }
  }
  if(value>=409 && value <= 411)// Checking if fourth button is pressed
  {
    digitalWrite(LEDs[3],HIGH);
    for(int i = 0; i<4; i++)
    {
      if(i!=3)
      {
        digitalWrite(LEDs[i],LOW);
      }
    }
  }
}
If you did everything as I said you should see your LEDs turning off and on depending which button is pressed. It is also possible to detect if several buttons have been pressed at once, it works the same way as with 1 button.


